
Article At A Glance: Stop Guessing Why Your Ball Curves Right
- A slice is caused by one of two things: an open clubface at impact, an out-to-in swing path, or a combination of both — and each has a different fix.
- The Traffic Light Method gives you a simple, repeatable system to diagnose exactly what your ball flight is telling you before you change a single thing in your swing.
- Your start line reveals your clubface angle, and your curve reveals your swing path — read both, and you already know what to fix.
- Most golfers aim left to compensate for their slice, which actually makes the problem worse by steepening the out-to-in path even further.
- There is a specific setup change that accelerates every fix covered in this article — and most golfers overlook it completely.
Your ball flight is already giving you the answer — you just need to know how to read it.
Every shot you hit leaves behind a trail of information. The direction it starts, the way it curves, how much it drifts — all of it points directly back to what happened at impact. The problem is that most golfers watch where the ball lands and immediately start guessing. They tinker with their stance, adjust their grip, swing harder, swing softer, and repeat the same frustrating pattern for years without ever identifying the actual cause.
That is exactly what the Traffic Light Method is designed to fix. Rather than guessing, you learn to read your ball flight like a language. Stryper Golf, a golf instruction and training resource, breaks down the physics of ball flight in a way that makes this kind of self-diagnosis genuinely accessible for everyday golfers. Once you understand the two forces controlling every shot, the traffic light framework snaps into place almost immediately.
Your Ball Flight Is Already Telling You What's Wrong
Every slice has a cause, and that cause happened before the ball even left the clubface. At the exact moment of impact, two measurable things determine everything about where your ball goes: the angle of your clubface and the direction of your swing path. Nothing else. Not your follow-through, not your finish position, not how hard you swung. Impact is the only moment that matters, and your ball flight is a direct readout of what happened there.
Here is why this matters so much for diagnosing a slice: a ball curving sharply to the right for a right-handed golfer is not a mystery. It is physics. The ball is spinning from left to right because the clubface was open relative to the direction the club was traveling at impact. The bigger that gap between face angle and path direction, the more spin, and the more dramatic the curve. Reading that curve backward gives you the diagnosis without needing a launch monitor or a professional lesson.
The Two Forces That Control Every Shot You Hit
Before the Traffic Light Method makes complete sense, it helps to understand the two forces it is built around. These are not concepts invented by golf instructors — they are the actual physics governing ball flight, and every shot you have ever hit was shaped entirely by them.
Clubface Angle: The Factor That Controls Start Line
Your clubface angle at impact determines where the ball starts its journey. If the face is pointing right of your target when it meets the ball, the ball will start right. If it is pointing left, the ball starts left. If it is square, the ball launches directly at your target. This is not influenced by your swing path, your body rotation, or your follow-through. The face angle is the dominant factor controlling the ball's initial direction, which is why it is the first thing to diagnose when something goes wrong. For more detailed insights, you can explore the ball flight laws.
Swing Path: The Factor That Controls Curve
Your swing path is the direction the clubhead is traveling through impact — either from outside-to-inside, inside-to-outside, or straight down the line. While the face angle sets the start line, the relationship between your face angle and your path angle is what creates spin and therefore curve. An out-to-in path with an open face produces the classic slice spin. An in-to-out path with a closed face produces draw spin. The path is the second piece of the puzzle, and you cannot fix your slice without addressing both.
Why the Gap Between Face and Path Is What Creates Your Slice
Think of it this way: if your clubface is pointing 5 degrees right of your target but your swing path is also traveling 5 degrees right, the face and path are matched and the ball flies with minimal curve. However, if your path is traveling 5 degrees left of target while your face is pointing 5 degrees right, you now have a 10-degree gap between them. That gap generates sidespin, and the larger that gap, the more violent the slice. Most chronic slicers have a gap far larger than they realize, which is why the ball curves so dramatically even on swings that feel controlled.
The Traffic Light Method Explained
The Traffic Light Method is a simple three-category system that matches your ball flight pattern to a specific diagnosis — and then points you directly to the fix. Instead of trying to analyze your swing mechanics mid-round or second-guessing what you felt during the swing, you simply watch the ball and match what you see to one of three signals.
Each signal — red, yellow, and green — represents a different combination of face angle and swing path at impact. Red means your face is the primary problem. Yellow means your path is the primary problem. Green means both are working together correctly, and your ball flight reflects it. The goal of the method is to move from red to yellow, and from yellow to green, one variable at a time.
This step-by-step approach prevents the most common mistake amateur golfers make when trying to fix a slice: changing too many things at once. When you change your grip, your stance, your takeaway, and your downswing all in the same session, you have no way of knowing which adjustment actually helped. The Traffic Light Method keeps you focused on one signal at a time.
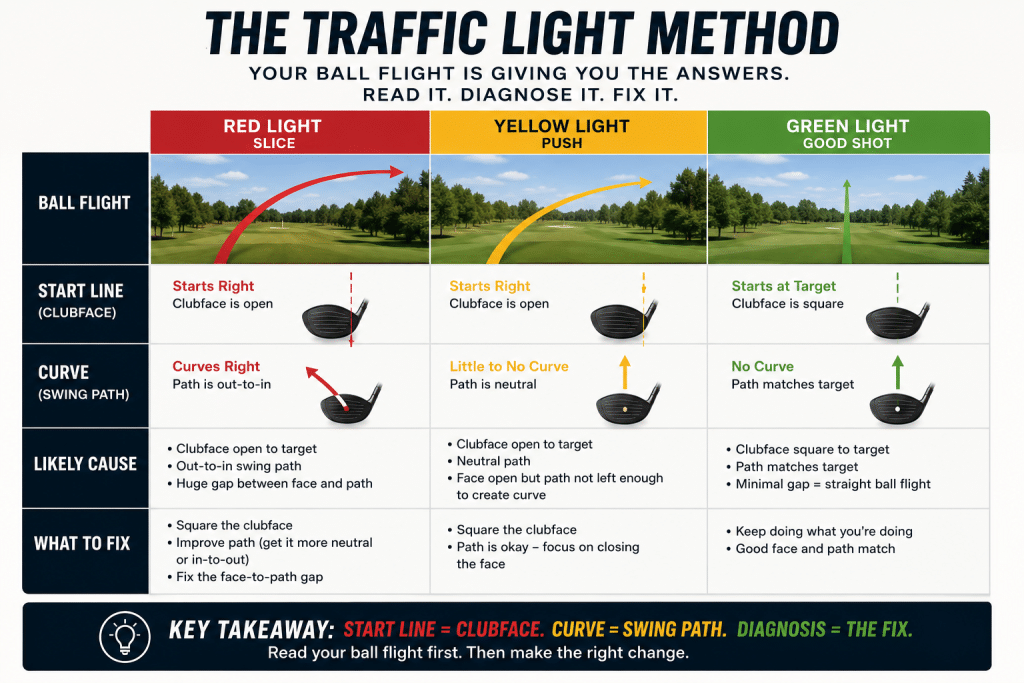
Red Light: Ball Starts Right and Curves Further Right
A red light shot is the most severe version of a slice. The ball starts right of your target immediately after contact and then continues curving further right as it flies. This tells you two things at once: your clubface is open at impact (causing the rightward start line) and your path relationship is making it worse (generating additional side spin). This is the most common pattern for high-handicap golfers who have never been formally taught how to hold the club or set up to the ball.
The red light signal means your clubface is the priority. Until you address what the face is doing at impact, no amount of path work will produce consistent results. You can fix your swing plane perfectly and still hit a hard slice if the face is wide open when it meets the ball.
Yellow Light: Ball Starts Straight but Fades or Curves Right
A yellow light shot starts on or very close to your target line but drifts or curves to the right as it travels. This is actually a sign of progress compared to a red light shot. It tells you your clubface is much closer to square at impact — hence the straighter start line — but your swing path is still traveling from outside to inside, generating enough spin to curve the ball off line. If you're struggling with swing path issues, you might find it helpful to read about fixing the over-correction in your grip.
Golfers stuck in the yellow light category often feel like they are hitting the ball better, but the results on the course are still frustrating. A shot that starts at the flag and fades into the right rough is still a missed fairway or green. The yellow light signal means path is now the priority, and the fixes become more focused on swing direction rather than clubface control.
Green Light: Ball Flies Straight or with a Controlled Draw
A green light shot either flies straight or moves gently from right to left. The face and path are working in harmony, with the face either square to the path or very slightly closed to it. This is the target state — not perfection, but consistency and control. Even professional golfers do not hit perfectly straight shots on every swing. What they have is a reliable, repeatable ball flight they can predict and aim accordingly. If you're struggling with consistency, you might want to explore why you slice your driver but not your irons to improve your game.
Signal Start Line Curve Direction Primary Cause Priority Fix Red Light Starts right Curves further right Open clubface + out-to-in path Clubface control first Yellow Light Starts straight or near straight Fades or curves right Out-to-in swing path Swing path correction Green Light Starts at target Straight or slight draw Face and path matched Reinforce and repeat
Once you can consistently identify which signal you are producing, the guesswork is completely removed from your practice sessions. You know what the problem is, you know which category of fix applies to you, and you have a clear benchmark — green light shots — to work toward.
How to Use the Traffic Light Method on the Range
The real power of this method comes from how you apply it during practice. Most golfers hit ball after ball on the range without a clear diagnostic process, which means they collect very little useful information from each shot. Here is a simple four-step process that turns any range session into a genuine feedback loop. If you're struggling with a slice, you might find this one-shot slice fix particularly helpful.
1. Watch the Start Line of Every Shot, Not Just Where It Lands
The moment the ball leaves the clubface, track the very first 10 to 15 yards of its flight. Ignore where it lands for now. You are only looking for one thing: did the ball start left of your target, right of your target, or directly at it? That initial direction is your clubface reading, and it is the most important piece of information you can collect from any shot.
This takes deliberate focus at first, especially if you are used to watching the full flight of the ball. Try picking a specific intermediate target — a tree, a yardage marker, or a flag — and ask yourself after every single shot whether the ball started left, right, or at that point. After a few sessions, this becomes automatic.
2. Track the Curve Direction After the Ball Leaves the Club
Once you have identified the start line, shift your attention to what the ball does next. Does it continue in the direction it started, straighten out, or curve in the opposite direction? The curve is your swing path reading, and together with the start line, it completes your full diagnosis.
A ball that starts right and curves further right is a red light. A ball that starts relatively straight but drifts right is a yellow light. A ball that starts at the target and holds its line or moves slightly left is a green light. These are the only three outcomes that matter during your diagnostic practice sessions.
3. Match What You See to the Correct Traffic Light Signal
After each shot, immediately assign it a color before you reach for the next ball. Say it out loud if it helps — red, yellow, or green. This simple act of labeling each shot forces you to actually process the feedback instead of dismissing a bad shot and moving on. Over time, this builds an instinctive connection between what you feel in the swing and what the ball does in the air.
Do not try to make swing changes between every shot during this phase. The goal right now is diagnosis, not correction. You are building a picture of your pattern, and that picture needs enough data points to be reliable. Changing your swing after every shot introduces too many variables and makes it impossible to identify your true tendency.
4. Identify Your Pattern After 10 Shots
After hitting 10 shots with the same club — a 6-iron or 7-iron works best for this exercise — tally your results. How many red lights, yellow lights, and green lights did you produce? Your dominant color is your diagnosis. If you're consistently seeing red lights, you might want to explore how to fix a slice without changing your swing.
If seven out of ten shots are red lights, your clubface is the clear priority and you should go directly to the red light fixes. If the majority are yellow lights, your face is already improving but your path needs work. If you are seeing a mix of red and yellow, start with the clubface — path corrections will not hold if the face is still inconsistent.
Keep this tally on your phone or a small notepad between sessions. Tracking your color distribution over time gives you a concrete measure of progress that is far more useful than simply trying to remember whether you hit it well or poorly last Tuesday.
Red Light Fixes: Your Face Is Wide Open at Impact
A red light diagnosis points directly at one thing: your clubface is not squaring up at the moment it meets the ball. The face is rotating through impact too slowly, arriving in an open position that sends the ball starting right and spinning further right. Before you touch your swing path, alignment, or anything else, the face has to be addressed first. Everything else is secondary until this is resolved.
The two most effective places to address an open clubface are your grip and your lead wrist position at the top of the swing. These are not cosmetic adjustments — they are structural changes that directly influence how the face behaves through the impact zone. Get either of these right and you will see immediate changes in your ball flight, often within the same practice session.
Strengthen Your Grip Without Squeezing Tighter
Strengthening your grip means rotating both hands slightly to the right on the handle (for right-handed golfers), not gripping harder. When you look down at your lead hand at address, you should be able to see at least two and a half knuckles. Most chronic slicers can only see one.
Your trail hand should sit underneath the club rather than on top of it. This position pre-loads the clubface into a more neutral angle before you even start the swing, which means it has far less distance to travel to reach square at impact. Make this change and hit 10 balls before adjusting anything else.
Check Your Lead Wrist Position at the Top of the Swing
At the top of your backswing, pause and feel the position of your lead wrist — that is your left wrist if you are right-handed. If it is cupped or bent backward, the clubface is almost certainly open, and it will stay that way through impact unless something dramatic happens in the downswing.
You want that lead wrist to be flat or very slightly bowed. Tour players like Dustin Johnson take this to an extreme with a heavily bowed lead wrist, which is one reason he generates so much draw spin. You do not need to go that far, but moving from cupped to flat is often the single biggest improvement a red light golfer can make.
Yellow Light Fixes: Your Path Is the Problem
Yellow light golfers have already made real progress — their clubface is much closer to square, which is why the ball starts on a better line. The remaining problem is a swing path that still travels from outside to inside through the impact zone, imparting enough left-to-right spin to push the ball off line. Here are the core patterns that create and maintain an out-to-in path:
- Starting the downswing with the shoulders: When the upper body fires first from the top of the backswing, the club gets thrown outside the ideal plane and the path becomes steeply out-to-in.
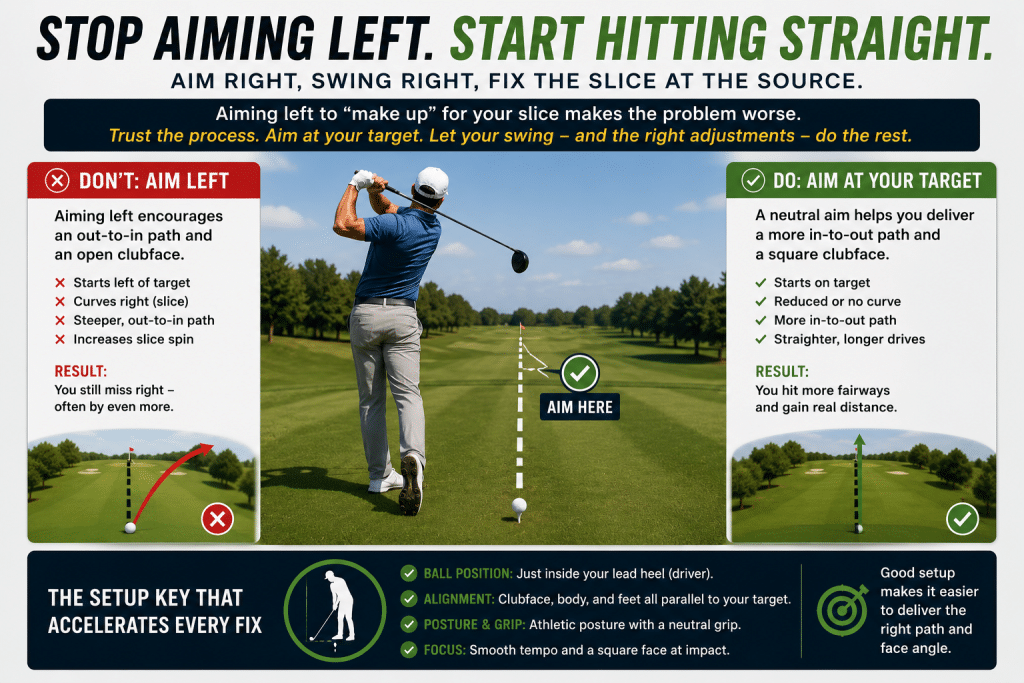
- Aiming left as a compensation: Golfers who have sliced for years often aim their body left to allow for the curve, which actually steepens the out-to-in path and makes the problem self-reinforcing.
- A steep takeaway: Picking the club up too steeply in the backswing sets the club above the correct plane, making an outside-in downswing path the only natural option from that position.
- Early extension through impact: Standing up out of your posture as you approach the ball forces the arms to re-route the club over the top, contributing directly to the out-to-in path.
The common thread connecting all of these is that the club arrives at the ball from the wrong direction. Your body has learned a compensation pattern, and it has likely been reinforcing that pattern for a long time. The good news is that path patterns respond quickly to the right drills — often faster than face angle issues do — because path is more directly influenced by conscious movement choices during the swing.
The most important thing to understand about fixing a yellow light path problem is that you cannot simply aim more right and expect it to work. Aiming right without actually changing the swing direction just shifts where your bad shots land — it does not fix the mechanics. The path itself has to change, and that requires deliberate, structured practice rather than course-round tinkering.
Two drills and one setup adjustment are responsible for the majority of path improvements seen in amateur golfers who commit to fixing the yellow light problem. The gate drill addresses the path directly at impact. The lower body lead cue addresses the sequencing issue that causes the outside-in path in the first place. And the alignment stick setup removes the compensation habit that has been quietly making everything worse.
The Gate Drill to Groove an Inside-Out Path
Place two tees in the ground just slightly wider than your clubhead — one just outside the heel side of the ball and one just outside the toe side — positioned a few inches behind the ball on a slight diagonal that represents your target line. The goal is to swing the club through the gate from the inside without clipping either tee.
If you consistently hit the outside tee (the one on the heel side), your path is coming over the top. If you clear both tees cleanly, your path is tracking from inside to square. Start with half swings at reduced speed before building back up to full swings.
What makes this drill particularly effective is the immediate physical feedback. You do not need a launch monitor or a coach watching you — the tees tell you instantly whether your path is correct. Hit 20 balls through the gate in every practice session for two weeks and your path will shift measurably. Most golfers notice a change in ball flight within the first session.
Start the Downswing With Your Lower Body, Not Your Arms
The single most common cause of an out-to-in swing path is starting the downswing with the shoulders and arms instead of the lower body. When your upper body fires first from the top of the backswing, the club gets thrown outside the ideal swing plane and the path becomes steeply out-to-in through impact. The fix is a sequencing change, not a swing shape change — and it starts with your lead hip.
From the top of your backswing, consciously initiate the downswing by bumping your lead hip slightly toward the target before anything else moves. Think of it as a small lateral shift followed immediately by a rotational turn. This movement pulls the hands and club down on the inside of the swing plane rather than throwing them over the top.
It feels strange at first — most golfers describe it as feeling like they are going to hit the ball way to the right — but that feeling is actually confirmation that the path is moving in the right direction. Trust the ball flight, not what the swing feels like from the inside.
Use Alignment Sticks to Eliminate the Outside-In Habit
Place one alignment stick along your toe line pointing directly at your target, and a second stick on the ground angled slightly right of the target, representing the path direction you are trying to swing along. At address, your feet, hips, and shoulders should be square to the first stick.
During the swing, your goal is to feel the club traveling along the direction of the second stick through the impact zone — from inside the target line to outside it. Even just having these sticks on the ground changes your spatial awareness at address and gives your brain a visual reference for what an in-to-out path actually looks like. Use this setup for every range session until the correct path feels natural rather than manufactured.
The One Setup Change That Accelerates Every Fix
Before you implement any of the red or yellow light fixes, there is one setup adjustment that makes all of them more effective: fixing your alignment. Most chronic slicers aim their body significantly left of the target — sometimes by as much as 30 to 40 yards at a full driver distance — as an unconscious compensation for the ball curving right.
When you aim left and the clubface is open, the slice gets worse, not better, because the leftward alignment steepens your out-to-in path even further. The fix is simple but uncomfortable at first. Place an alignment stick along your toe line and check where it is actually pointing. For most golfers, the stick will point well left of the intended target.
Adjust your stance until your feet, hips, and shoulders are genuinely square to the target line, and then commit to swinging at the actual target — not the compensated one your body has been aiming at for years. This single change creates the physical space for an inside-out path to happen naturally and allows the clubface fixes to produce their full effect instead of being neutralized by a misaligned setup.
When You Hit Green Light Shots, Here Is What to Do Next
Hitting green light shots consistently is not the end of the process — it is the beginning of building a reliable swing. The most important thing you can do when green light shots start appearing regularly is resist the urge to keep changing things. This is where many improving golfers sabotage their own progress. They feel the improvement, get curious, start experimenting with other swing tips, and unravel the very mechanics they just worked hard to build. When something is working, your only job is to repeat it until it is automatic.
The best way to lock in green light mechanics is to shift from diagnostic practice to pressure practice. Instead of hitting balls on the range with zero consequences, start playing games that simulate on-course pressure. Hit three balls to a specific target with your 7-iron and score yourself — one point for green light, zero for yellow, minus one for red. This turns the Traffic Light Method into a performance game rather than a mechanical drill, which is exactly the kind of practice that translates from the range to the course.
Stage What to Focus On Practice Goal Success Benchmark Red Light Grip strength and lead wrist position Move start line to target or left of target 7 out of 10 shots start on or left of target line Yellow Light Gate drill, lower body sequencing, alignment Eliminate rightward curve after straight start 7 out of 10 shots hold line or draw slightly Green Light Pressure practice and repetition Make reliable ball flight automatic under pressure Consistent green lights on course, not just range
Once you are producing green light shots reliably under simulated pressure, take the method on the course with you. After every tee shot or iron, assign it a color in your head. You are not going to fix swing mechanics between shots on the course — that is range work — but tracking your color distribution during a round gives you precise information to take back into your next practice session.
Over time, this feedback loop between the course and the range is what separates golfers who genuinely improve from those who stay stuck at the same handicap for years.
Frequently Asked Questions
The Traffic Light Method generates a lot of questions from golfers who are new to ball flight diagnosis, particularly around how to apply it in real practice conditions and whether it works for every type of player. The answers below address the most common questions directly.
Understanding the underlying physics — face angle controls start line, path controls curve, and the gap between them controls the severity of the slice — makes all of these answers easier to apply. The method is not a magic fix. It is a structured way of using information you already have access to on every single shot.
What is the Traffic Light Method in golf?
The Traffic Light Method is a ball flight diagnostic system that categorizes every shot you hit into one of three signals based on its start line and curve direction. Red light shots start right and curve further right, indicating an open clubface as the primary problem.
Yellow light shots start on line but fade or curve right, indicating an out-to-in swing path as the primary problem. Green light shots fly straight or draw slightly, indicating that the face and path are working in harmony.
The method works because it isolates the two variables that control all ball flight — clubface angle and swing path — and gives you a color-coded way to identify which one needs attention first. Rather than making multiple swing changes simultaneously and losing track of what is actually helping, the Traffic Light Method keeps your practice focused on one variable at a time.
It is equally useful on the driving range and on the course. On the range, it gives you a structured diagnostic framework for practice sessions. On the course, it gives you a quick labeling system after each shot that builds a pattern profile you can take back to the range and work on with precision.
What causes a ball to start right and curve further right?
A ball that starts right and curves further right — the classic red light pattern — is caused by a clubface that is open at impact combined with a swing path that is traveling from outside to inside relative to the target line.
The open face produces the rightward start line, and the gap between the face angle and the path direction generates left-to-right sidespin that curves the ball further right as it flies. The larger the gap between the face and the path, the more dramatic the curve. In most cases, the clubface issue needs to be addressed first through grip adjustments and lead wrist position before path corrections will have any meaningful effect.
Can I fix my slice without taking a lesson?
Yes — many golfers significantly reduce or eliminate their slice through self-directed practice using the right diagnostic framework. The Traffic Light Method provides the structure you need to identify the cause of your slice and apply the correct fix without a coach watching every swing. The grip strengthening adjustment, the gate drill, the lower body sequencing cue, and the alignment correction are all changes you can implement independently on the range.
That said, a qualified instructor can identify secondary issues — like early extension, a steep shoulder plane, or a grip that is fundamentally incompatible with your swing — that are harder to self-diagnose. If you have been working on your slice for more than a month with no measurable improvement in your traffic light color distribution, a single lesson with a professional is a highly efficient investment.
How many practice sessions does it take to stop slicing?
Most golfers who commit to the diagnostic process and apply the correct fixes for their traffic light color see meaningful improvement within three to five dedicated range sessions. Moving from a consistent red light pattern to a yellow light pattern — meaning the clubface is squaring up but the path still needs work — often happens within the first one or two sessions after strengthening the grip and addressing the lead wrist position.
Moving from yellow to green typically takes longer because path patterns are more deeply ingrained motor habits. Expect four to six weeks of consistent practice before green light shots become your dominant pattern rather than occasional bright spots in an otherwise frustrating session.
Does the Traffic Light Method work for left-handed golfers?
Yes, the Traffic Light Method applies equally to left-handed golfers with the directions mirrored. For a left-handed golfer, a slice curves from right to left, meaning the ball starts left and curves further left. A red light shot for a left-handed golfer starts left and curves further left, indicating an open clubface. A yellow light shot starts relatively straight but fades left, indicating an out-to-in path from the left-handed golfer's perspective — which is a path traveling from the golfer's right to their left through impact.
All of the fixes — grip strengthening, lead wrist position, the gate drill, lower body sequencing, and alignment correction — apply directly but with all directional references reversed.
The underlying physics are identical regardless of which hand you lead with. Clubface angle still controls start line, swing path still controls curve, and the gap between them still determines spin rate and curve severity. Left-handed golfers can use the same range diagnostic process, the same 10-shot tally method, and the same pressure practice games to move from red light to green light with the same expected timeline as right-handed golfers.
If you are serious about making progress on your slice, Stryper Golf offers structured instruction and training resources designed to help golfers of all levels build better ball flight through a clear understanding of impact mechanics.
Understanding why you slice your driver but not your irons can be a perplexing issue for many golfers. The key often lies in the differences in swing mechanics and club design. While irons are designed for precision and control, drivers are built for distance, which can sometimes lead to a more exaggerated slice.