
Article-At-A-Glance: Fix Your Slice Before Saturday
- A golf slice is caused by a combination of an outside-in swing path, an open clubface at impact, and poor pre-shot setup — and most of it starts before you even take the club back.
- Ball position and stance alignment are the two most overlooked slice fixes, and you can correct both of them today with zero equipment changes.
- A weak grip is quietly keeping your clubface open at impact — there's a simple two-knuckle adjustment that fixes this immediately.
- There are three specific drills in this guide that reinforce the correct swing path and clubface position so the changes actually stick on the course.
- Most golfers can see a noticeable improvement in ball flight within one practice session when they address the root cause at address rather than trying to manipulate the swing mid-motion.
Most golfers try to fix their slice by changing their swing — but the real problem is usually set up long before the club ever moves.
A slice happens when the clubface is open relative to the swing path at impact, creating clockwise sidespin that sends the ball curving hard to the right (for right-handed golfers). The ball may start left of the target, but it spins aggressively right and ends up in the rough, the trees, or the next fairway over. It's the most common shot problem in amateur golf, and it costs strokes every single round. Simple Golf Path breaks down the root causes of the slice clearly, and the fix almost always starts with what you're doing at address — not mid-swing.
Understanding the actual mechanics is what separates a permanent fix from a temporary patch. The clubface must be open relative to the club path to produce a slice — not just open to the target. That distinction matters. A severe outside-in club path combined with an open clubface pointing left of the target is the classic slice recipe. Fix the path and the face, and the slice disappears.
Your Slice Starts at Address, Not in Your Swing
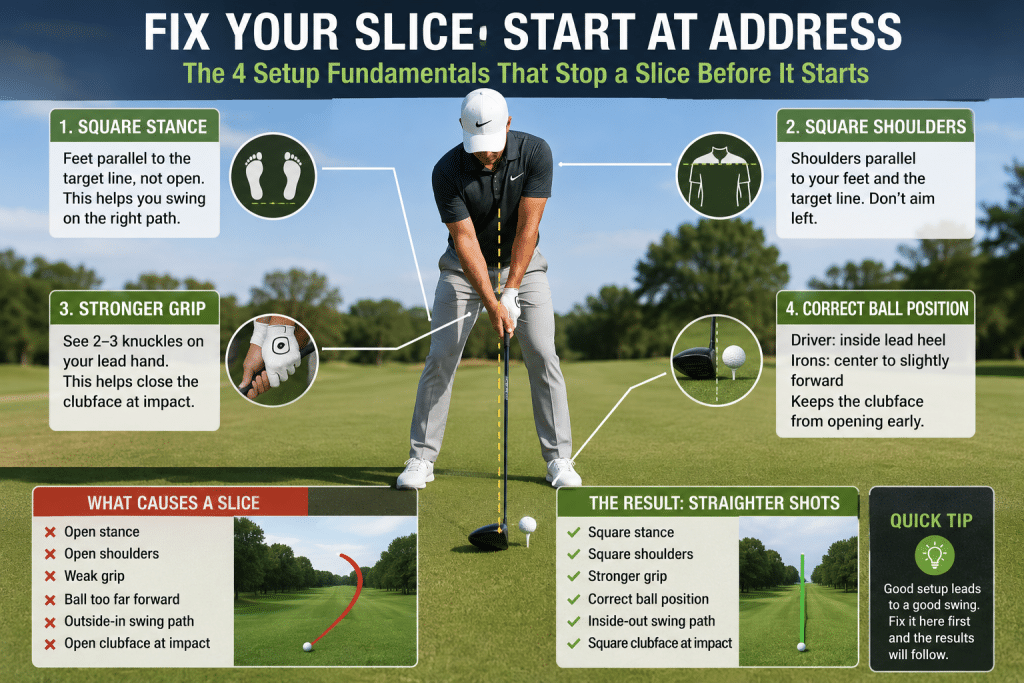
Before you blame your downswing or your follow-through, check your setup. The vast majority of recreational golfers who slice are already in a compromised position before they move the club an inch. Open feet, open shoulders, weak grip, and incorrect ball position — any one of these can produce a slice, and most slicers have all four working against them at the same time.
The good news is that address positions are the easiest things to change in golf. You don't need to rebuild your swing. You need to rebuild your setup routine.
Why an Open Stance Causes a Slice
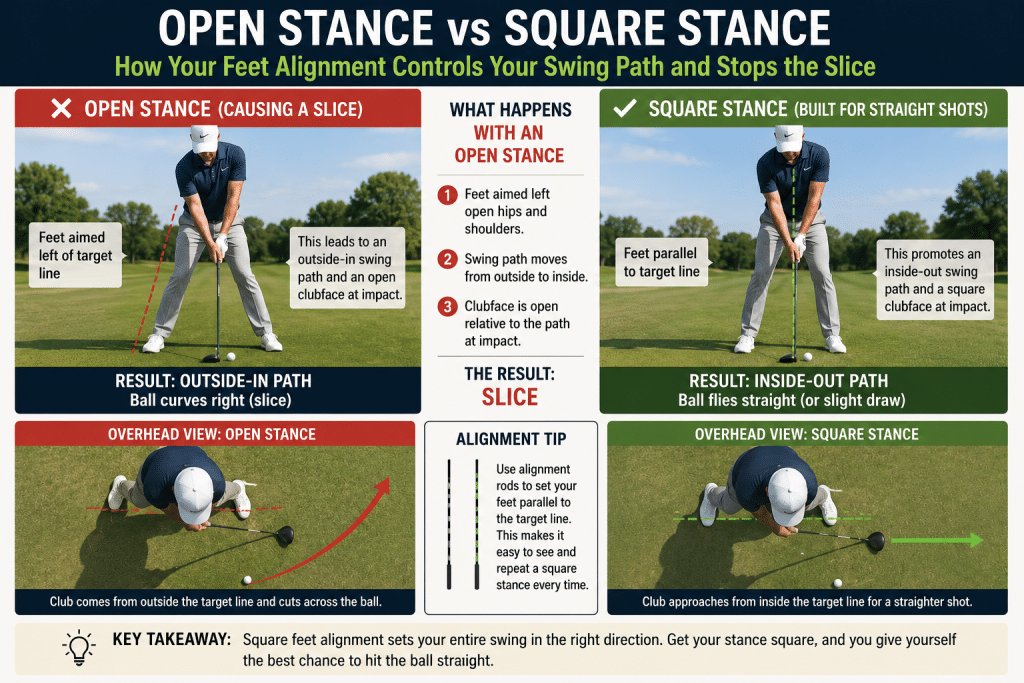
An open stance means your feet are pointing left of the target line (for right-handed golfers). It feels natural to many golfers because it opens up the view of the target and feels like it gives you room to swing through. But it's one of the primary drivers of the outside-in swing path that produces a slice.
How Open Feet Alignment Forces an Outside-In Swing Path
When your feet are aimed left, your entire body — hips, shoulders, and swing path — follows that same left-pointing direction. The club naturally approaches the ball from outside the target line and cuts across it through impact. That's the definition of an outside-in path. Combined with even a slightly open clubface, you've got a slice locked in before the backswing even starts.
Think of your feet as train tracks that your swing runs on. If the tracks are pointed left, the train goes left — and the ball reacts to that misdirected path with heavy rightward spin. The more open the stance, the more severe the outside-in path, and the more dramatic the slice.
Many golfers actually aim open intentionally over time, because they've learned to expect the slice and try to compensate by starting the ball further left. This makes the problem worse. You end up with an even more exaggerated outside-in path and an even bigger slice. The correction is to stop compensating and start fixing.
How to Move From an Open Stance to a Square Stance
A square stance means the line across your toes runs parallel to the target line — not pointing at the target itself, but parallel to it. If you've been standing open for years, this will feel like you're aimed too far right. That's normal. Trust the alignment, not the feeling. For those looking to improve their game, consider exploring the TaylorMade RSI 1 vs Performance Golf RS1 comparison for better performance insights.
Here's how to check and correct your stance in real time on the range: learn how to fix a slice effectively by adjusting your stance and ball position.
- Pick a specific target in the distance.
- Place a club on the ground along your toe line after you take your stance.
- Step back and look at where that club is pointing.
- If it's pointing left of your target, bring your lead foot back until the club on the ground runs parallel to the target line.
- Re-address the ball from that corrected position.
Do this every time you hit balls on the range until the square stance becomes automatic. It won't feel right immediately — but your ball flight will tell you the truth faster than your feelings will.
Use Alignment Rods to Check Your Stance in Minutes
Alignment rods are the single best practice tool for slicers working on their stance. Place one rod along your toe line and a second rod parallel to it along the target line. This gives you an instant visual reference that eliminates guesswork. You'll know immediately whether you're square, open, or closed — no more estimating.
You can pick up a basic set of alignment rods for under $15, and they do more for your slice than any training aid that costs ten times as much. Use them every range session until your square stance is automatic.
Where to Position the Ball to Stop Slicing
Ball position is one of the most underrated slice contributors in the game. Get it wrong and even a corrected stance won't fully eliminate the open clubface at impact.
Ball Too Far Forward Promotes an Open Clubface at Impact
When the ball is positioned too far forward in your stance — toward your lead foot — the clubface has already started rotating back to open by the time it reaches the ball. You're catching the club after it's passed the optimal impact point, which means the face is open and the path is cutting across the ball. The result is exactly the sidespin that causes a slice.
Many golfers move the ball forward trying to hit it higher or get more distance. With a driver, some forward position is correct — but there's a limit. Push it too far toward your lead heel and you've built a slice into every single swing regardless of what else you fix. To understand more about this common issue, you can read about why you slice your driver but not your irons.
The Correct Ball Position for a Driver vs. Irons
Ball position isn't one-size-fits-all — it changes depending on the club you're hitting. For instance, many golfers wonder why you slice your driver but not your irons. Here's a straightforward reference:
| Club | Ball Position | Reference Point |
|---|---|---|
| Driver | Forward | Inside of lead heel |
| Fairway Woods | Slightly forward of center | One ball inside lead heel |
| Mid Irons (5–7) | Center to slightly forward | Just ahead of center |
| Short Irons (8–PW) | Center | Middle of stance |
For slicers specifically, even within these guidelines, erring slightly toward center (rather than forward) can help close the clubface a fraction more at impact. It's a small adjustment with a meaningful effect on the ball flight, especially with longer clubs where the slice spin is most exaggerated.
Your Grip Is Making the Slice Worse
Once your stance and ball position are squared away, the next thing that's quietly destroying your ball flight is your grip. Most slicers have what's called a weak grip — and it has nothing to do with how tightly you're holding the club.
A weak grip in golf means your hands are rotated too far toward the target on the handle, which makes it almost impossible for the clubface to square up naturally at impact. Your hands want to return to a neutral position through the hitting zone, and if they're starting in a weak position, the face stays open when it counts most.
What a Weak Grip Looks Like and Why It Opens the Clubface
Stand at address and look down at your lead hand (left hand for right-handed golfers). If you can only see one knuckle — or none at all — your grip is weak. The V-shape formed between your thumb and forefinger will be pointing toward your lead shoulder instead of your trail shoulder. In this position, the clubface naturally resists closing through the impact zone, leaving it open and sending the ball spinning right.
How to Strengthen Your Grip in One Simple Adjustment
Strengthening your grip doesn't mean squeezing harder. It means rotating both hands slightly away from the target — toward your trail side — on the handle. This single adjustment changes the entire behavior of the clubface through impact.
Start with your lead hand. Place the club handle across the base of your fingers, not across the palm. Rotate your hand to the right (for right-handed golfers) until you can see two to three knuckles when you look straight down at address. The V formed by your thumb and forefinger should point toward your right shoulder or your chin — not your left shoulder.
Then match your trail hand to the lead. The trail hand's V should also point toward the trail shoulder. When both hands are in a stronger position together, they work as a unit through the swing and naturally encourage the clubface to rotate closed at the right moment — right at impact.
- Weak grip: Only one knuckle visible on lead hand, V pointing toward lead shoulder — clubface stays open at impact.
- Neutral grip: Two knuckles visible, V pointing toward chin — clubface has a better chance of squaring up.
- Strong grip: Two to three knuckles visible, V pointing toward trail shoulder — clubface rotates to square more easily, reducing slice spin.
For most slicers, moving from a weak to a neutral or slightly strong grip produces an immediate change in ball flight. The first few shots may feel like you're going to hook the ball, but that's just your hands adjusting to a position that actually works. If you find yourself over-correcting, you might want to check out this guide on fixing the over-correction.
The Two-to-Three Knuckle Rule for Lead Hand Grip
The two-to-three knuckle rule is the simplest checkpoints in golf. At address, glance down at your lead hand — if you see fewer than two knuckles, rotate the hand clockwise (for right-handers) until two knuckles are clearly visible. That's your baseline strong grip. It takes about five seconds to check and it directly affects whether the clubface is open or square at the moment that actually matters.
Shoulder Alignment Is the Hidden Slice Trigger
You can fix your feet, your ball position, and your grip — and still slice — if your shoulders are open at address. Shoulder alignment is the most overlooked piece of the setup puzzle, and it's the one that tends to sneak back in even after golfers have worked on everything else.
Open shoulders at address point your entire upper body left of the target, which tilts the swing plane outward and pulls the club across the ball from outside to inside. Even a quarter-turn of open shoulder alignment is enough to reintroduce an outside-in path — and bring back the slice with it.
How Open Shoulders Pull the Club Across the Target Line
Your shoulders set the plane of your swing more than almost any other part of your body. When they're open — pointing left of the target — the backswing moves to the outside automatically, and the downswing follows that same outward track. The club arrives at the ball from outside the target line and cuts across it, imparting that leftward-to-rightward sidespin that defines the slice. Fixing your feet without fixing your shoulders is like patching one leak while another one runs wide open.
How to Square Your Shoulders at Address
After you set your feet square to the target line, take a moment to consciously check your shoulders. Drop a club across your chest and see where it points — it should run parallel to your target line, matching your feet. If it's pointing left, you're set up to slice before you've done a single thing wrong in your swing. Pull your lead shoulder back slightly and feel your chest rotate to face more toward the ball. That's the square position. Build this check into your pre-shot routine and it becomes automatic within a few range sessions.
3 Drills to Reinforce Your New Stance and Ball Position
Knowing what to fix is one thing — getting it to show up under pressure on the course is another. These three drills are specifically designed to ingrain the correct swing path and clubface position so the changes you've made at address translate into real shots.
Work through these drills in order on the range before you take your changes to the first tee. Start slow, focus on feel, and only pick up speed once the motion feels natural. Rushing through swing changes with full-speed swings before the pattern is grooved is one of the main reasons golfers revert to their old slice within a round or two.
None of these drills require special equipment. An alignment rod, a glove, and a mid-iron are all you need to run through all three and start seeing real results in your ball flight.
1. The Slow-Motion Glove Logo Drill to Square the Clubface
Take your address position and make slow-motion swings, focusing entirely on the logo on the back of your glove. Through the impact zone, your goal is to rotate that glove logo so it faces the ground — or even slightly downward toward the target — rather than skyward. When the logo faces the sky through impact, your clubface is open. When it rotates toward the ground, the face is squaring up. Do this at 25% speed for ten to fifteen reps before every range session until the rotation feels natural at full speed.
2. The Trail Foot Back Drill for an Inside-Out Swing Path
This drill directly attacks the outside-in swing path that causes most slices. By pulling your trail foot back several inches at address, you physically close your stance and force the club to approach the ball from the inside. It feels awkward at first — that's exactly the point. Your body is being placed into a position it hasn't experienced before, and that new sensation is what retrains the swing path.
Set up to a mid-iron normally, then pull your trail foot back about four to six inches behind the target line. Hit balls from this exaggerated closed stance and pay attention to two things:
- The club should feel like it's approaching from behind you — that's the inside-out path you're training.
- The ball flight should be straighter or even draw slightly to the left — that's the correct sidespin replacing the slice spin.
- Your follow-through should feel like you're swinging out toward right field rather than cutting across to the left.
- Your hips should be clearing toward the target, not blocking the downswing path.
Hit ten to fifteen balls with the trail foot pulled back, then gradually move it back toward a square position while trying to preserve that inside-out feeling. The goal isn't to play from a closed stance forever — it's to use the exaggerated position to teach your body what the correct path feels like so you can reproduce it from a square setup.
Once the inside-out path starts to feel natural, you'll notice your divots pointing more toward the target rather than left of it. That's confirmation the drill is working. Your divot direction is one of the most honest feedback tools in golf — it shows you exactly where the club was traveling at impact, no guesswork involved.
3. Ball Above the Feet Drill to Promote an Inside-Out Path
Find a gentle slope on the range or course where the ball is above your feet. Address the ball normally on this slope and hit several shots. When the ball is above your feet, the slope automatically flattens your swing plane and promotes a more inside-out path — the exact movement you need to eliminate a slice.
The ball will tend to draw or fly straighter than your normal swing. Pay close attention to how that swing feels and try to replicate that same flat, around-the-body motion when you return to flat ground. Even five or six shots from this slope position can give your brain and body a reference point for what the correct path feels like.
Make These Changes Now and Play Better on Saturday
Square your stance, move the ball back slightly, strengthen your grip to show two to three knuckles, and square your shoulders. Run through the three drills on the range the day before your round. That's the entire plan — and it's more than enough to show up on Saturday with a straighter ball flight than you had last weekend.
The slice doesn't have to be a permanent part of your game. It's a setup problem with a setup solution, and you now have everything you need to fix it. If you're dealing with an open clubface or out-to-in path, addressing these setup issues can be particularly beneficial.
Frequently Asked Questions
Here are answers to the most common questions golfers have when working through stance and ball position fixes for a slice.
Does Ball Position Really Affect a Slice?
Yes — ball position directly affects where in the clubface's rotation arc it makes contact with the ball. Too far forward in the stance means the clubface has already passed its square point and is rotating back open, which imparts the clockwise sidespin that produces a slice.
Moving the ball even half an inch back toward the center of your stance can make a measurable difference in how square the clubface is at impact. For slicers using a driver, keeping the ball just inside the lead heel — rather than off the toe — is often the specific adjustment that starts showing results immediately.
How Far Back Should I Move the Ball to Fix a Slice?
For most slicers, moving the ball one to two ball-widths back from where it currently sits is enough to start seeing improvement. You're not trying to play it from the middle of your stance with a driver — you just want to bring it back to the correct position, which is inside the lead heel. Start with one ball-width back, hit five shots, and assess the ball flight before making further adjustments.
Can an Open Stance Alone Cause a Slice?
An open stance alone can be responsible for the outside-in club path that produces a slice. When your feet point left of the target, your swing naturally follows that same direction, cutting across the ball through impact. Even if your grip and ball position are correct, an open stance can override those fixes and keep the slice alive. It's one of the most direct causes of the outside-in path and should be the first thing you check at address.
How Quickly Can I Fix My Slice With Stance Adjustments?
Many golfers see a noticeable improvement in ball flight within a single focused practice session when they address the root cause at setup rather than trying to manipulate the swing mid-motion. Stance and grip changes are pre-swing adjustments, which means they take effect immediately — you don't have to wait for muscle memory to build over weeks. The changes may feel uncomfortable for the first twenty to thirty swings, but the ball flight feedback will confirm you're on the right track faster than any feeling will.
Should I Change My Grip and Stance at the Same Time?
Yes — and here's why that matters. Your grip and stance are both address positions, meaning they're both set before the swing starts. Changing one without the other often produces mixed results because they interact with each other. A square stance with a weak grip still leaves the clubface open at impact. A strong grip with an open stance still produces an outside-in path.
The most effective approach is to fix both together during a dedicated range session where you can focus entirely on the setup without worrying about score or distance. Use alignment rods to check your stance, check your knuckles to verify your grip, and then hit balls with both corrections in place simultaneously. Your brain processes the combined change as one new pattern rather than two competing adjustments.
Give yourself at least one full range session — ideally two — before taking the changes to the course. The first session is about learning the new positions. The second session is about starting to trust them. By the time you step onto the first tee on Saturday, the setup should feel familiar enough that you can execute it under mild pressure without reverting to old habits. Simple Golf Path offers additional resources for golfers working through exactly this kind of swing and setup overhaul — worth bookmarking as you continue improving your game.